Monday 2 March 2020

System Restore Unexpected Error 0x81000203

System Restore does not work Unexpected Error 0 x 81000203

1 Ensure Volume Shadow Copy Status is Running and Automatic in Services.MSC
2 Run sfc scannow in MsDOS as Administator
3 The one that worked for me was the Registry Edit inserting "volsnap" procedure below


Checking the UpperFilters Parameter

UpperFilter values exist in different registry classes and if they are configured incorrectly it can cause an issue during the restore process. Therefore, in this step, we will be checking to see if they are entered properly. For that:
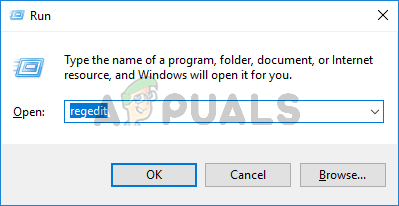
  1. Press “Windows” + “R” to open Run prompt.
  2. Type in “regedit” and press “Enter“.
    Typing Regedit in Run to Open Registry Editor
  3. Navigate to the following address inside the registry
    Computer\HKEY_LOCAL_MACHINE\SYSTEM\CurrentControlSet\Control\Class\{71a27cdd-812a-11d0-bec7-08002be2092f}
  4. In the right pane, check to see if “volsnap” value is entered for the “UpperFilters” entry.
    Checking the “Volsnap” value for the UpperFIlters entry
  5. If not, double click on the “UpperFilters” entry and enter “volsnap” in the Value Data option.
  6. Click on “OK” and check to see if the issue persists.
 

Monday 25 March 2019

DropBox is Free but Limited to 3 Devices

As from March 2019 Dropbox is limited to 3 Devices.
The good news is that the change only applies to any new devices you attempt to link to your account. "If you're a Basic user and you linked more than three devices prior to March 2019, all of your previously linked devices will remain linked, but you can't link additional devices," Dropbox said in the help document.
This probably explains why free users haven't noticed the policy update unless they've purchased new hardware.

Tuesday 5 March 2019

NAS Diskstation not Showing in Windows Explorer Network

I resolved my issue with following steps - it might work for you too..
Open the Synology Disk Station  URL is http://192.168.0.139:5000/
1) DSM
2) Control Panel/Files Services/Windows File Service/Advanced Settings

3) Tick  "Enable Windows Network Discovery to allow File Access via SMB 
Close DSM 

Sunday 9 December 2018

Get Rid of Dictation Option on iPad Keyboard

A bug exists in iOS 11  whereby turning turning off the dictation option does not remove the key on the keyboard.


The Fix.
Picture 1 remove EMOJI in Settings >Keyboard>Emoji.....Remove
in Picture 2 go to Settings General and >Dication
Enable Dictation.
Go to Notes and use keyboard
No go back to Settings and Dictation . Remove
Back to Notes the key should disappear.

Saturday 1 December 2018

. Dell XPS 8920 Boot Up message "Checking Media Presence)

After a Recent BIOS update a fault occurred and  this message shows on boot up.

>>> checking media presence...

>>> media present...

>>> start pXE over IPv4...

The PC will start eventually after a long delay checking each media presence in the list and not finding it..


It is trying to boot up on the network, using the PXE (Pre eXecution Environment) instead of "Windows Boot Manager"
PXE is one of the components of Intel's WfM specification. It allows a workstation to boot from a server on a network prior to booting the operating system on the local hard drive.

How to FIX

Enter BIOS SETUP,  press F12 and change the "order" of checking the above boot devices
Your motherboard can "boot" from several sources:
Ensure that top of the list is "Windows Boot Manager"


Enter BIOS SETUP, and change the "order" of checking the above boot devices.
Move the 'disk-drive' to the top of the list, and move the  'PXE' options below it towards  the bottom of the list.

F12 on a Dell PC.
You will only see in the Boot mode listing the option to boot from USB or DVD if they have bootable media fitted on start up.
This answer was on a Forum.
Dell XPS 8920 How to enable boot from emergency disk or memory stick?   
The XPS 8920 uses a UEFI Windows Boot Manager.
You must press F12 when you boot up and see the Dell logo. If you have a bootable CD/DVD in the CDROM drive or a bootable memory stick in the USB port you will see that device in the boot menu and you can select it from there. There is no boot sequence selection in the BIOS setup.


Sunday 21 October 2018

NAS Drives not visible in Windows 10 File Explorer

To see all computers and NAS on your local network
Homegroup has been removed in Windows 10 update
In box type Services
This, open windows services (winlogo + X >Run type services.msc) on each of your win 10 computers take a look if these services below are starting if not start them and put the first one on automatic and the second one on manual
Function Discovery Discovery Resource Publication  (Running) (automatic)
UPnP Device Host service  (Running) ( manual)
Computer Browser (Running) (Manual)
Run Control Panel, select Program and features.
In the left of the panel click Turn Windows features on or off.
in the pop up window scroll down to the SMB setting, click the + sign to the right of it, all options should be ticked.
For some reason the middle option for client in my settings had been unticked and I can only assume this was done by the last Windows update.
As soon as I clicked this box saved and rebooted, everything worked
 
In Windows 10 v 1803, Windows File Explorer cannot see your NAS as a computer, and fails to show it when you click Network, and/or fails to show it in the left-hand navigation pane when you expand the Network entry.
The problem may be intermittent, or it may start to work eventually, or fail to work after a PC reboot.
Cause:-
Microsoft are aware of a bug introduced in Windows 10 v 1803 that may cause this issue for some users. The startup state for 2 Windows services may be set to Manual, when it should be set to Automatic. They are working on a fix that doesn’t require user intervention.
I spent half an hour in a remote support session with MS today, when Synology Chat could not provide an answer, but Synology did confirm it was a Windows issue, not a NAS issue after reviewing my settings.
In the meantime, here is the solution that Microsoft provided. I had already worked it out, and they confirmed my diagnosis. Their case number for my session is 1433947730. If you contact MS support via chat or other means, quote that number and they will be able to access the details of my chat and the remote session actions taken.
Solution:-
In the taskbar search box, type “services”. Click to open the Services app.
Scroll down to the services called a) Function Discovery Provider Host , and b) Function Discovery Resource Publication. The Startup Type column for both should be set to Automatic. If the bug affects you it may be set to Manual.
To change the Startup Type to Automatic, right-click the task, select Properties, and in the settings panel that opens, on the General tab, half-way down, click the drop-down list for Startup Type and select Automatic. Repeat this for both tasks.
To be sure this takes effect, restart the PC, re-open the Services app and check that the Startup Type is now Automatic for both tasks. The Function Discovery Resource Publication task status should show as Running. The Function Discovery Provider Host status may be blank and may start when needed by Windows.
You should find that in File Explorer, the NAS is shown immediately as a network device in the Computer section if you click on Network in the navigation pane. If you open it, the NAS shared folders should be visible. If you expand the Network entry in the navigation pane, it may take 30 seconds or more for network discovery to complete. A green progress bar may scroll across the address bar. When it’s complete, all your private and shared folders should be visible in the navigation pane if you expand your NAS entry.
If this solution works for you, or fails to work, you might want to reply to this post so we can all see what level of success is achieved.
When you click to select a task in the Services window, a full description of its purpose is displayed in the left hand pane. I can’t copy and paste them here, as copy is not enabled in the app.
I should add that the Windows bug only affects the 2 services in my original post, according to MS.
Also that the above does not cover the enabling of Windows network discovery in the first place, which may be off by default in Windows, particularly if you've not previously installed a network device. The Synology NAS getting started guide does tell you to do that.
To enable network discovery go to Control Panel\All Control Panel Items\Network and Sharing Centre\Advanced sharing settings. Select Private (current profile) by clicking the drop-down arrow, set the radio button to Turn On Network Discovery, and check the tick-box below that to turn on automatic setup of network devices.
Starting the affected services without first enabling network discovery may not work (not tried it).
If you just enable network discovery, the services may be started for you once, but may not be restarted automatically when you reboot your PC. So you need to do both steps. Windows network discovery first, then set both services to start automatically following my instructions.
Wednesday 26 September 2018

If text in your Web Page has Black Diamonds with a Question Mark


To Fix


If text shows as this instead of apostrophe ’ or quotation marks  “ ”

 My favourite feature was �My Most Unforgettable Character,� a collection of memories about a specific person in the writer�s life. I could actually catalogue quite a few of these as both my main jobs entailed moving on a lot and working and meeting many people. Only a few, however, I would tag as �unforgettable.� 


Change the HTML coding in the character set (charset to the ISO-8859-1 )


New Page 1


New Page 1